This past year has been busy -- but the result has been TWO new books with tons of amazing science and other geeky projects for kids and families!
Geek Mom: Projects, Tips, and Adventures for Moms and Their 21st-Century Families is a new book from Potter Craft co-authored by me and the other editors of Wired.com's GeekMom blog: Natania Barron, Corrina Lawson and Jenny Williams.Written primarily for moms who want to share their geeky interests with their kids, it includes fun activities like superhero costumes, math puzzles, snack food hacks, and science-y crafts, as well as a whole chapter of at-home experiments.
Robotics: Discover the Science and Technology of the Future with 20 Projects, a book for kids ages 9-12 from Nomad Press, is packed full of information about how robots work and contains "low tech/no tech" projects based on actual robotics research. No special tools or skills are needed to build any of the working robotics models in this book -- just ordinary crafts materials and recycled electronics parts!
We recently tried a new and improved version of the lava lamp project from several years ago. It worked great! Here's how we did it:
Tools and Materials: • Clean recycled soda or water bottle, label removed, 16 oz or larger • Water • Food coloring • Baby oil, at least one 12 oz bottle • Effervescent antacid tablets (such as Alka-Seltzer) • LED push light (or make a light-up base from a recycled jar or can, some extra bright LED bulbs, coin batteries, and tape) • Plastic plate or other protection for table • Cooking (meat) thermometer (optional)
Step 1: Prepare the lava lamp bottle. The first step in building your homemade lava lamp is to find a tall, thin, clear bottle. Any size or shape will do. A plastic bottle, such as a recycled soda or mineral water bottle, will eliminate worries about breakage if it falls. We used a 16-ounce bottle, which is large enough to get the full floating blob effect, but only requires one 12-ounce bottle of baby oil. A larger lamp bottle will last longer but you’ll need more baby oil to fill it. Rinse the bottle clean and remove any labels. A glue solvent like “Goo Gone” can make scraping off a tough label easier.
Step 2: Prepare the Bottom Layer of Colored Water. Once you’ve got your bottle ready you can begin filling it. The exact chemical formula used to make real lava lamps is a trade secret (although the UK manufacturer Mathmos has a cool video on its website showing the lamp being assembled). But as with the egg timer which inspired it, the gooey “lava” is actually a type of wax. And the way it slowly floats up and drifts down has to do with the balance between the density of the wax and the density of the liquid it floats in.
Density tells us how much of a substance is contained within a certain volume, or amount of three-dimensional space. The higher the density, the more stuff is in there. And density can change with temperature. For instance, at room temperature the wax in a lava lamp is denser than the liquid, so it sits at the bottom of the lamp. When the light is turned on and the wax warms up, it begins to melt and spread. As the volume of wax in the lamp grows, its density decreases, because the same number of molecules are now taking up more space. At the point where the wax becomes less dense than the liquid, it starts to float to the top of the lamp. Eventually the wax at the top, away from the hot light, starts to cool. As it becomes denser, the wax sinks down, is warmed by the light, and the cycle repeats itself in a colorful mesmerizing display.
Our homemade version uses water and oil, but the principle is the same. Oil is less dense than water, so the water in our lamp sinks to the bottom, while the oil floats to the top. When we introduce a less dense gas into the water, bubbles form that carry some of the water slowly up through the oil. By coloring the water with dye, we can approximate a lava lamp-type effect that lasts several minutes.
If spilling food coloring or oil is a concern, place your bottle on a plastic plate or other protected surface. (They can also stain clothing, so old clothes or an apron may be advisable.) Fill the bottle about one quarter full with water. Add 3 to 4 drops of liquid food coloring for a 16-ounce bottle, or more for a larger bottle.
Before you shake up the bottle to mix the food coloring, take a few moments to watch as the dye begin to spread in vibrant tendrils of color, all on its own. That seemingly spontaneous, random movement is called Brownian motion, after the botanist Robert Brown. In 1827, Brown looked at grains of plant pollen in a drop of water through a microscope and noticed that they jiggled around. In 1905, Einstein suggested that the pollen grains were moving because they were colliding with molecules of water, and predicted that the way the grains moved could be used to figure out how many molecules of water there were. Scientists later showed that Einstein’s prediction was correct -- one of the first proofs of the existence of atoms and molecules.
Once you’ve mixed up the food coloring and water as evenly as possible, by shaking, stirring, or just letting Brownian motion do its thing, check to see if you need to add any more dye. To get the lava lamp effect to work, you want the water to look pretty dark. But don’t go overboard at this point. If necessary, you can add more food coloring later on in the process.
Step 2: Add the Top Layer of Oil. Now that you’ve got your colored “lava” layer ready, it’s time to add the clear liquid. We use baby oil, which is colorless and available pretty much anywhere. Baby oil is mostly mineral oil -- a non-toxic byproduct of the manufacture of gasoline, used to lubricate cooking tools and to make gummy candy -- with a little fragrance added to make it smell nice. Compared to cooking oil, baby oil is also inexpensive. I picked up a 12-ounce-size bottle, enough for one 16-ounce homemade lava lamp, at my local dollar store. Of course, you can use any kind of cooking or skin care oil you have on hand, as long as it’s not too dark to see through.
Pour the oil into the lava lamp bottle slowly, stopping when you reach the bottle’s shoulder. You’ll want to leave a little head room so the lamp solution doesn’t bubble over. Let the bottle sit for a minute or two, so that the contents settle into two layers: colored water on the bottom, oil on top, with a nice sharp line in between.
Here’s where density comes in. As already mentioned, oil is less dense than water, so the same volume of oil weighs less than an equal volume of water. In scientific terms, the specific gravity of mineral oil – or the ratio of its density compared to the density of water – is about 0.8 to 1. However, there’s another reason that oil and water form two neat layers, and it has to do with the bonds that make molecules stick together with other molecules.
If you could see a water molecule, you’d notice two little hydrogen atoms sitting on top of a bigger oxygen atom like the ears on Mickey Mouse’s head. Those “ears,” which each have negatively-charged electrons whirring around them, give that end of the water molecule a slightly negative charge. That makes water a type of polar molecule. Just like magnets, the negative end of polar molecules is attracted to the positive end of other polar molecules. Oil molecules, on the other hand, are non-polar. They’re made up of long chains of carbon and hydrogen atoms, which don’t have a charged side. Non-polar molecules will form bonds with other kinds of non-polar molecules (“like dissolves like”), but when put together with polar molecules, they keep to themselves. So when people say “oil and water don’t mix,” what they’re really talking about is molecular polarity!
Step 3: Set up the lights. So far you’ve built what science teachers call a density column – one type of substance floating on another. To turn it into a lamp, you need to add a base with a light source. A small battery-powered LED push light is ideal. These look like discs with three or four LED bulbs embedded in them. You can find inexpensive versions in the flashlight section of your local dollar store or discount mart. Just set the LED push light on your plate or protected surface, and carefully place your lava lamp bottle on top so that the liquid inside is lit up.
If you can’t find one of these handy lights, you’ll have to make your own base. A large sturdy plastic jar or a can should work fine. Arrange some new or re-used LED bulbs inside. To power them, slip a button battery between the wires of each LED bulb and tape in place.
Step 4: Start the action! Unlike real lava lamps, which run on the heat of a light bulb, our homemade lava lamp is powered by the energy released when you drop an effervescent (fizzing) antacid tablet like Alka-Seltzer into water. You’ll probably have to break the tablet in half to fit it in the opening of the bottle, but try to use as large a piece as possible. The bigger the piece, the more dramatic the effect!
As the tablet hits the layer of water at the bottom of the homemade lava lamp, it begins to release bubbles of gas. Because gases have a lower density than liquids, the bubbles float slowly upward through the thick layer of oil, carrying drops and blobs of water along with them. But when the bubbles reach the surface, the gas continues rising, while the denser water that’s left behind drifts back down to the bottom of the lamp. The lava lamp effect will continue as long as the tablets are fizzing. You can keep adding pieces of antacid tablets to prolong the show, until the oil gets too cloudy to see through.
What’s happening when the tablet begins to fizz is actually the same chemical reaction as the classic baking soda-and-vinegar volcano. Fizzing tablets contain an acid (powdered citric acid, which gives lemon juice its sour taste) and a base (sodium bicarbonate, our old friend baking soda). Acids are compounds with an excess of hydrogen (H+) ions, or hydrogen atoms that are missing their electron and have a positive charge. Bases have a surplus of hydroxide (OH-) ions, which are negatively-charged molecules of oxygen and hydrogen. Strong acids and bases are highly reactive – they’ll combine with, and start to dissolve, many types of material, including your clothing and skin. But put them together in the right amounts and they’ll neutralize each other to produce water! (H+ and OH- make H2O.) When fizzing tablets react, they also produce a salt (in this case, sodium citrate) and carbon dioxide (the gassy bubbles).
Know what else is cool? The reaction of fizzing tablets and water creates an endothermic reaction. That means that those chemical changes are pulling heat out of the surrounding water to use as fuel. So as it’s fizzing, your lamp is dropping in temperature. Try sticking a cooking thermometer in your bottle to see if you can detect the change in temperature. (You might want to skip the lights, since they may give off a small amount of heat energy.)
Unfortunately, all our best videos are just a couple seconds long. But if you're interested:
DISCOVER is currently producing a Web TV show about home science experiments and demonstrations, and we're looking for submissions—the most enlightening, visually impressive, surprising, or just plain funny videos out there. Submit your video below (it's OK if you've already uploaded it elsewhere on the Web) and we'll select the best ones for the show. (Winners will of course be identified.)
We did one of the nanoscience experiments from NISE Net and posted it on Home Physics. This bit of Kitchen Nanoscience demonstrates how difference in scale affects forces like gravity. It's quick and easy, if you've got some dollhouse or LEGO-sized drinking vessels around!
I've started a new category in my sidebar for links to chemistry experiments you can easily do at home. They include some activities from NiseNet, the Nanoscale Informal Science Education website. While these are designed for museums and schools, many of them are easy to do at home too. I've already printed out the paper model Bucky ball to try later!
This week we did a number of experiments with oil, water, food coloring and various props to explore the property of surfaces. The physical properties like surface tension and solubility are related to the strength of Intermolecular Forces -- the attractive forces between molecules.
3 bowls or containers with water liquid soap pepper a piece of string a paper clip a fork a needle
Bowl 1:
1. Sprinkle pepper on the surface of cold clean water in a shallow dish. Allow the particles to spread out and cover the surface.
2. Put your finger in the bowl.
3. Put a drop of liquid soap on your finger. Put your finger in the bowl again.
What should happen: Pepper should rush away from your finger in a star pattern.
What did happen: Pepper rushed away from finger in a circle -- still impressive.
Bowl 2:
1. Float a small loop of string in the middle of the surface of water.
2. Put a drop of liquid soap inside the loop.
What should happen: The surface tension inside the loop of string should weaken by the soap but the surface tension outside the string should have pulled the string outward.
What did happen: The string sank before we could try step 2.
Bowl 3:
1. Lower a paper clip and a needle flat onto the water surface using the fork. They should float.
2. If they don't, place a paper towel on the surface of the water, place the objects on the paper, and then remove the paper.
3. Now put a drop of liquid soap on the water surface.
What should happen: As soon as the tension is broken by the soap, these items should sink to the bottom.
This one worked as planned!
Density Column
Joy of Chemistry, page 131
2 clear glasses or plastic cups Glycerin Water Food coloring Cooking oil Liquid soap Plastic spoon
1.Pour about an inch of water into the cup.
2.Add food coloring to the water.
3.Pour about an inch of glycerin into the second cup.
4.Gently add colored water.
5.Add oil until you get three layers.
6.Stir. Allow to settle.The water will mix with the glycerin, but the oil will separate back out.
7.Add a layer ofliquid soap.
8.Stir gently. The oil will mix with the glycerin.
What's Happening: Different liquids have different densities, and according to the density, the liquids will settle in a certain order when mixed. Oil is less dense than water and therefore will settle on top of water.
(NOTE: Glycerin--C3H5(OH)3, which can be bought in drugstores -- can be added to dish soap to make long-lasting bubble solution. Bubbles eventually burst once the layer of water evaporates, but glycerin forms weak hydrogen bonds with water, delaying evaporation. )
Lava Lamp
(Sorry that it's sideways. When I figure out how to fix it, I will repost it!)
Tall narrow jar Water Food coloring Vegetable oil Salt
Directions:
1. Fill the cylinder with water.
2. Add the food coloring. Do not let the water become too dark.
3. Slowly pour oil into the cylinder. It should make a thick layer on top of the water.
4. Slowly sprinkle the salt into the cylinder on top of the oil. The salt coats the oil and causes it to fall to the bottom of the graduated cylinder in globs. The oil will gradually return to the top of the graduated cylinder.
What happened:
Vegetable oil is less dense than water. When the salt is added, it sticks to the oil and drags it down. Once at the bottom, the water dissolves the salt and the oil floats back up.
The reason the oil doesn't dissolve into the water happens because of its difference in polarity. Water and salt are both polar. Oil is non-polar. Only polar substances will dissolve polar substances. A non-polar substance will not dissolve in a polar substance. This is the rule of "like dissolves like."
As a continuation of our foray into heat-producing (exothermic) chemistry, we mixed up some solutions that became colder (endothermic). Endothermic reactions involve electrons jumping to higher orbitals, which requires an input of energy. The atoms absorb energy in the form of heat from the surrounding environment, thereby lowering the temperature. Unfortunately notetaking that day was not optimal, but here is an idea of what we did:
Since we didn't have the recommended styrofoam cups for mixing our solutions -- which I assume were supposed to provide some insulation between the solution and the air temperature around it -- we used doubled-up paper coffee cups (just like my favorite coffee shop). We used a meat thermometer I found around the house (purchased for a greenhouse gas experiment I never got around to doing) and a 99 cent house thermometer I picked up at Wal-Mart. All the experiments dropped a few degrees almost immediately, going from a water temperature of about 60 degrees Fahrenheit (sorry, we're working in an American kitchen, not a lab with metric measurements) to about 55 or 50 in a minute or so. You could just barely feel the difference by putting your finger in it (we totally forgot gloves and eye protection for this one), so the thermometer is a must.
First was potassium chloride, found in salt substitute. We mixed in an unmeasured proportion with tap water.
Next, we cut open a cold pack from an old first-aid kit. The cold-pack consisted of two compartments, one containing urea(or crystalized peepee, used in cigarettes, pretzels, bath oils, cloud seeding, and tooth whitening -- although I think they make it artificially!) and the other water. You're supposed to squeeze the water portion, which I guess forces it into the other portion. We just poured the crystals into a cup and added water.
The third mixture was baking soda and citric acid. We only had a small jar (scavenged from some old science kit, I believe) so we put about half a teaspoon in the cup and mixed with a little water. Then we poured in some baking soda. It fizzed up nicely, of course, as it would with vinegar. According to about.com, the reaction was: H3C6H5O7(aq) + 3 NaHCO3(s) --> 3 CO2(g) + 3 H2O(l) + NaC6H5O7(aq)
Finally, we mixed some calcium chloride -- the kind of road salt used to melt icy sidewalks -- with water. Surprise! This one turned out to be exothermic. The temperature went up to 78 degrees. Pretty neat.
Lesson: Acid-catalyzed hydrolysis of acetylsalicylic acid to salicylic acid and acetic acid What Happened: We dissolved the active ingredient of aspirin in water, separated it from the binder, then purified the drug using sulfuric acid as a catalyst. The World of Chemistry video series, which you can watch online at Annenberg Media, has been serving as our spine lately. We were up to the episode on catalysts this week, so I found a demonstration from The Joy of Chemistry (actually from the chapter on organic chemistry) which used dilute sulfuric acid (sold as aquarium pH lowering solution) as a catalyst to purify aspirin. FYI, another example of a catalyst at work were the pineapple enzymes we used to dissolve Jello.
According to Wikipedia, the end product of this demonstration, salicylic acid, is what aspirin metabolizes into in the liver. Its name comes from the Latin word for the willow tree, Salix, from whose bark it can be obtained. Interestingly, it can also be derived from methyl salicylate (oil of wintergreen). In 1897, Felix Hoffmann, a chemist at Friedrich Bayer & Co., obtained acetylsalicylic acid by a reaction of salicylic acid and acetic anhydride; this is the basis for Bayer's claims to the discovery of aspirin.
Materials:
Safety glasses Rubber gloves 10-15 aspirin (plain or buffered) ½ cup (120 ml) rubbing alcohol (70% isopropyl) 2-4 large glass containers (we used a Pyrex bowl and old honey jars and canning jars) Coffee filters and rubber bands Sturdy plastic spoon Aquarium lowering solution (dilute sulfuric acid) Pipette or straw
Place aspirin in glass.
Pour in alcohol, a little more than needed to cover the aspirin.
Heat the glass in the microwave on 50% power for 30 seconds until warm but not boiling. The acetylsalicyclic acid will dissolve in the alcohol, leaving the starch binder.
Gently crush remaining residue with spoon to extract as much acid as possible. Let sit 15-30 minutes.
Take coffee filter and spread it over top of second glass. Push it down slightly so it resembles a funnel. Secure with rubber band.
Carefully pour the solution through the filter. The liquid that drips through is called the “mother liquor.” The acetylsalicylic acid has dissolved in the water. What's left on the filter is the starch binder that holds the drug in the pill shape.
Wearing gloves, dispose of coffee filter. Don’t touch the wet part.
Run a small stream of cold tap water. Take the glass with the mother liquor and add water until it is about ¾ full. Small white flakes of acid should begin falling out of solution. Let sit for a couple hours.
Set up another filter on another glass. Pour mixture through filter to separate out the crystals. Filter 2-3 times if needed, letting solution sit for 1-2 hours in between.
Allow to dry overnight, away from breezes. The crystals will become fluffy.
Take ¼ of wet or dry crystals and put into glass. Add aquarium solution dropwise with a pipette or straw until the entire sample is completely covered. The sulfuric acid is the catalyst and remains at the end, so be careful with the liquid.
Heat the mixture in the microwave for no more than 15 seconds at 50% power. It may start to steam immediately.
Remove glass. You should smell vinegar (acetic acid) evaporating. If not, wave your hand over the glass to waft the fumes towards your nose. The sludge that remains is salicylic acid.
Dispose of solids in the trash and liquids in the toilet.
NOTES: We ended up doing the demonstration twice -- although, as it turned out, we probably didn't need to -- because the shopping list at the beginning of the book didn't specify that the alcohol needed was 70% concentration. I found an old bottle of the right concentration, and we did everything over. However, we discovered that letting the first solution sit and filtering it several more times yielded enough crystals to do the demonstration.
In the end, we had twice as much acetylsalicylic acid as we needed. We probably used too much in the final step (as well as too much sulfuric acid, which I tried to pour slowly out of the bottle instead of using a pipette) because when we put it in the microwave, it immediately started steaming! I turned it off a few seconds short of 15 and the vinegar smell was overwhelming.
Lesson:Exothermic reactions produce heat What Happened:Iron powder began oxidizing (rusting) when exposed to the air, becoming hot
Bought these packets at Wal-Mart a few months ago and figured it was time to open one up and see what would happen. The "all-natural" ingredients seemed pretty safe to mess around with.
As soon as I poured the powder into the mason jar, it started to heat up. I don't know how hot it got (Note to self: Get thermometer!) but I suspect it was hotter than the temperatures listed above, because it didn't last as long. Probably because it was exposed to more air than if I had left it in the air-permeable packet. It may have dried out quicker, too.
Although you can't see it in the picture at the top, there was smoke coming out of the jar. We also tried mixing some with a little more water to see what happened. The heating process stopped. However, when I dipped a magnet into the resulting goop it did act a little like ferrofluid.
Jell-O gelatin was first patented in 1845 by Peter Cooper of Cooper Union.
Gelatin is a processed version of the protein collagen, a simple protein that makes up one-third of all proteins in the human body. The main source of the collagen that is used in Jell-O comes from hooves, bones, connective tissue found on cows, horses and pigs. Along with collagen, Jell-O consists of water, food coloring, sugar, and artificial flavors. Collagen is found in all living animals. This protein is what gives body parts strength, flexibility, and protection. There are five major categories of collagen that range from the fibers in your eyes to the structure of placentas. To harvest the collagen needed for gelatin the Jell-O Corporation turns to natural sources found in cows, horses, and pigs. The animals' body part's which were previously mention are ground up to expose the proteins within. After they are ground up the bio matter is then treated with a strong acid or base, which breaks down the cellular structures of the collagen to release the proteins from connective tissue. After the proteins become separated from the tissues the bio-mass is then discarded. Then, the mixture created from the released proteins (collagen proteins, which are the basis of Jell-O) and the strong acid or base is then boiled.
(From General Chemistry Online) Pineapple contains a plant enzyme called bromelain that breaks down proteins. Bromelain is used in many meat tenderizers for this purpose (and that's why cooking ham with pineapple makes it tender). JellO packages warn you not to put pineapple chunks into the gelatin. Jello is a protein mesh with trapped pockets of liquid; the bromelain cuts the protein chains and keeps the gelatin from jelling properly. Why do pineapples produce an enzyme that tenderizes meat? It's a defense mechanism. The sap of the pineapple plant contains much higher concentrations of bromelain and can cause severe pain if eaten.
Other uses for bromelain:
(From Wikipedia) Bromelain can be used in a vast array of medical conditions. It was first introduced in this area in 1957, and works by blocking some proinflammatory metabolites that accelerate and worsen the inflammatory process. It is an anti-inflammatory agent, and so can be used for sports injury, trauma, arthritis, and other kinds of swelling. Its main uses are treatment of athletic injuries, digestive problems, phlebitis, sinusitis, and aiding healing after surgery.
Lesson:Breaking molecular bonds can release energy in the form of light What Happened:We crunched Altoids in a dark room and saw blue-white sparks.
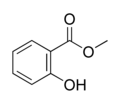
Traditionally, this demonstration is done with Wint-O-Green Lifesavers -- but the package I found at the supermarket listed only artificial ingredients. What makes the candy spark visible is the fluorescent property of wintergreen's aromatic essence, methyl salicylate. So we tried Altoids and Canada Mints. At night, we went into the bathroom (so we could see ourselves in the mirror), turned off the lights and waited a few minutes for our eyes to adjust to the dark. The Altoids worked well. The Canada Mints are slightly more chewy and hence, did not crunch well.
Triboluminescence occurs when molecules, in this case crystalline sugars, are crushed, forcing some electrons out of their atomic fields. These free electrons bump into nitrogen molecules in the air. When they collide, the electrons impart energy to the nitrogen molecules, causing them to vibrate. In this excited state, and in order to get rid of the excess energy, these nitrogen molecules emit light -- mostly ultraviolet (nonvisible) light, but they do emit a small amount of visible light as well. This is why all hard, sugary candies will produce a faint glow when cracked.
Although it was fun to watch the bright flashes of light in our mouths, we had to stop after a few candies because the sharp mintiness got to us.
Interestingly, as I learned from Wikipedia, methyl salicylate, or C6H4(HO)COOCH3, is what gives Ben-Gay its minty heat. It can cause poisoning and even death when eaten or applied to the skin in large amounts.