search

Tampilkan postingan dengan label Joy of Chemistry. Tampilkan semua postingan

Rabu, 07 Mei 2008

Surfaces and Density


This week we did a number of experiments with oil, water, food coloring and various props to explore the property of surfaces. The physical properties like surface tension and solubility are related to the strength of Intermolecular Forces -- the attractive forces between molecules.

Surface Tension Experiments

These came from the website of the Chicago Section of the American Chemical Society

3 bowls or containers with water
liquid soap
pepper
a piece of string
a paper clip
a fork
a needle

Bowl 1:

1. Sprinkle pepper on the surface of cold clean water in a shallow dish. Allow the particles to spread out and cover the surface.

2. Put your finger in the bowl.

3. Put a drop of liquid soap on your finger. Put your finger in the bowl again.

What should happen: Pepper should rush away from your finger in a star pattern.

What did happen: Pepper rushed away from finger in a circle -- still impressive.

Bowl 2:

1. Float a small loop of string in the middle of the surface of water.

2. Put a drop of liquid soap inside the loop.

What should happen: The surface tension inside the loop of string should weaken by the soap but the surface tension outside the string should have pulled the string outward.

What did happen: The string sank before we could try step 2.

Bowl 3:

1. Lower a paper clip and a needle flat onto the water surface using the fork. They should float.

2. If they don't, place a paper towel on the surface of the water, place the objects on the paper, and then remove the paper.

3. Now put a drop of liquid soap on the water surface.

What should happen: As soon as the tension is broken by the soap, these items should sink to the bottom.

This one worked as planned!

Density Column
Joy of Chemistry, page 131


2 clear glasses or plastic cups
Glycerin
Water
Food coloring
Cooking oil
Liquid soap
Plastic spoon

1. Pour about an inch of water into the cup.

2. Add food coloring to the water.

3. Pour about an inch of glycerin into the second cup.

4. Gently add colored water.

5. Add oil until you get three layers.

6. Stir. Allow to settle.The water will mix with the glycerin, but the oil will separate back out.

7. Add a layer of liquid soap.

8. Stir gently. The oil will mix with the glycerin.

What's Happening: Different liquids have different densities, and according to the density, the liquids will settle in a certain order when mixed. Oil is less dense than water and therefore will settle on top of water.

(NOTE: Glycerin--C3H5(OH)3, which can be bought in drugstores -- can be added to dish soap to make long-lasting bubble solution. Bubbles eventually burst once the layer of water evaporates, but glycerin forms weak hydrogen bonds with water, delaying evaporation. )

Lava Lamp


(Sorry that it's sideways. When I figure out how to fix it, I will repost it!)

Tall narrow jar
Water
Food coloring
Vegetable oil
Salt

Directions:

1. Fill the cylinder with water.

2. Add the food coloring. Do not let the water become too dark.

3. Slowly pour oil into the cylinder. It should make a thick layer on top of the water.

4. Slowly sprinkle the salt into the cylinder on top of the oil. The salt coats the oil and causes it to fall to the bottom of the graduated cylinder in globs. The oil will gradually return to the top of the graduated cylinder.

What happened:

Vegetable oil is less dense than water. When the salt is added, it sticks to the oil and drags it down. Once at the bottom, the water dissolves the salt and the oil floats back up.

The reason the oil doesn't dissolve into the water happens because of its difference in polarity. Water and salt are both polar. Oil is non-polar. Only polar substances will dissolve polar substances. A non-polar substance will not dissolve in a polar substance. This is the rule of "like dissolves like."

Minggu, 06 April 2008

Aspirin Lab


Lesson: Acid-catalyzed hydrolysis of acetylsalicylic acid to salicylic acid and acetic acid
What Happened: We dissolved the active ingredient of aspirin in water, separated it from the binder, then purified the drug using sulfuric acid as a catalyst.

The World of Chemistry video series, which you can watch online at Annenberg Media, has been serving as our spine lately. We were up to the episode on catalysts this week, so I found a demonstration from The Joy of Chemistry (actually from the chapter on organic chemistry) which used dilute sulfuric acid (sold as aquarium pH lowering solution) as a catalyst to purify aspirin. FYI, another example of a catalyst at work were the pineapple enzymes we used to dissolve Jello.

According to Wikipedia, the end product of this demonstration, salicylic acid, is what aspirin metabolizes into in the liver. Its name comes from the Latin word for the willow tree, Salix, from whose bark it can be obtained. Interestingly, it can also be derived from methyl salicylate (oil of wintergreen). In 1897, Felix Hoffmann, a chemist at Friedrich Bayer & Co., obtained acetylsalicylic acid by a reaction of salicylic acid and acetic anhydride; this is the basis for Bayer's claims to the discovery of aspirin.


Materials:

Safety glasses
Rubber gloves
10-15 aspirin (plain or buffered)
½ cup (120 ml) rubbing alcohol (70% isopropyl)
2-4 large glass containers (we used a Pyrex bowl and old honey jars and canning jars)
Coffee filters and rubber bands
Sturdy plastic spoon
Aquarium lowering solution (dilute sulfuric acid)
Pipette or straw


  1. Place aspirin in glass.
  2. Pour in alcohol, a little more than needed to cover the aspirin.
  3. Heat the glass in the microwave on 50% power for 30 seconds until warm but not boiling. The acetylsalicyclic acid will dissolve in the alcohol, leaving the starch binder.
  4. Gently crush remaining residue with spoon to extract as much acid as possible. Let sit 15-30 minutes.

  1. Take coffee filter and spread it over top of second glass. Push it down slightly so it resembles a funnel. Secure with rubber band.
  2. Carefully pour the solution through the filter. The liquid that drips through is called the “mother liquor.” The acetylsalicylic acid has dissolved in the water. What's left on the filter is the starch binder that holds the drug in the pill shape.
  1. Wearing gloves, dispose of coffee filter. Don’t touch the wet part.
  2. Run a small stream of cold tap water. Take the glass with the mother liquor and add water until it is about ¾ full. Small white flakes of acid should begin falling out of solution. Let sit for a couple hours.
  1. Set up another filter on another glass. Pour mixture through filter to separate out the crystals. Filter 2-3 times if needed, letting solution sit for 1-2 hours in between.
  2. Allow to dry overnight, away from breezes. The crystals will become fluffy.
  3. Take ¼ of wet or dry crystals and put into glass. Add aquarium solution dropwise with a pipette or straw until the entire sample is completely covered. The sulfuric acid is the catalyst and remains at the end, so be careful with the liquid.
  4. Heat the mixture in the microwave for no more than 15 seconds at 50% power. It may start to steam immediately.
  5. Remove glass. You should smell vinegar (acetic acid) evaporating. If not, wave your hand over the glass to waft the fumes towards your nose. The sludge that remains is salicylic acid.
  6. Dispose of solids in the trash and liquids in the toilet.


NOTES: We ended up doing the demonstration twice -- although, as it turned out, we probably didn't need to -- because the shopping list at the beginning of the book didn't specify that the alcohol needed was 70% concentration. I found an old bottle of the right concentration, and we did everything over. However, we discovered that letting the first solution sit and filtering it several more times yielded enough crystals to do the demonstration.

In the end, we had twice as much acetylsalicylic acid as we needed. We probably used too much in the final step (as well as too much sulfuric acid, which I tried to pour slowly out of the bottle instead of using a pipette) because when we put it in the microwave, it immediately started steaming! I turned it off a few seconds short of 15 and the vinegar smell was overwhelming.

Selasa, 12 Februari 2008

Precipitation


No, it's not raining or snowing (at the moment). Last week we did two (of four) small demonstrations from The Joy of Chemistry to illustrate how different conditions affect whether a solid will go into a liquid in solution or fall back (precipitate) out. Here, in my non-official lab report style, are our results:

Demo 1: Baking Soda
Effect of Temperature and Amount

Materials

Baking soda
Water
Glass measuring cup
Plastic spoon

Directions

1. Add a pinch of baking soda to 2 cups of water. Stir to dissolve.
2. Keep adding pinches (about 10-15) until solution starts to become cloudy and baking soda fall to the bottom.
3. Microwave glass for 30 seconds, until warm.
4. Is solution clear? Does precipitate dissolve with stirring?

Observations

It took 45 "pinches" of baking soda to get enough precipitate on the bottom of the cup to notice. The water was only barely cloudy. Measuring out the baking soda in 1/4 or 1/2 teaspoon amounts -- or using less water -- would make the process go faster.

Heating the cup in the microwave even a small amount did allow all the baking soda to go into solution.

As a demo for kids, less than impressive.


Demo 2: Chalk in Water and Vinegar
Effect of Condition of Salt and of Solution

Materials


Prang* white chalk
4 plastic cups
Water
Vinegar

NOTE: Prang brand chalk worked great! (Not like our first attempts with other chalk.) Still haven't found it for sale locally, though -- I found some in a school I visited and borrowed a piece.

Directions

1. Break chalk into 4 pieces.
2. Crush 2 teaspoons of chalk.
3. Fill 2 drinking cups with 1 cup of water. Fill other 2 cups with 1 cup of vinegar.
4. Place 1 whole piece in first cup of water. What happens?
5. Place 1 teaspoon crushed chalk in water and observe. Stir. What happens?
6. Repeat with chalk and vinegar. What happens?

Observations


Whole piece in water: Nothing
Powdered chalk in water: Water got very cloudy
Whole piece in vinegar: Chunks of chalk broke off in layers and floated to the top!
Powdered chalk in vinegar: First it foamed up. After a few minutes, chunks started bobbing up and down!

(Took some lovely video of the bobbing effect which came out sideways. When I can convert the MOV file to AVI so I can rotate it in Windows Movie Maker -- or get more chalk and re-shoot it -- I will post it!)

Rabu, 06 Februari 2008

New and Improved About.com Chemistry Page


Today I'm making up a worksheet of experiments to do later in the week about solutions and precipitates, based on our "spine," The Joy of Chemistry. While I find the book helpful in organizing my lessons (and, of course, providing all my information), it hasn't worked for us as a read-aloud. So what I do is go through the chapter I want to cover, find the demonstrations that I think we can do (based on availability of materials and risk level) and type them up. Surprisingly, despite the analogy the authors make to "The Joy of Cooking," the "recipes" in their book are integrated right into the text. So unless you're reading it surrounded by your fully-appointed and ready-to-use laboratory, it's a little hard to do the demonstrations just using the book. To make them usable for us, I've been putting them into recipe form -- Explanation, List of Equipment and Ingredients, Directions. I told both co-author Monty Fetterolf and his publisher's PR person that if they don't come out with a new edition, I'm going to write my own companion volume when I'm done!

One other thing I've been doing is finding similar, related experiments to add to, modify or replace some of the demonstrations in the book that I feel could use improvement (or just can't resist tinkering with). My main source for this information has been Anne Helmenstine's Chemistry section at About.com. I just scooted over there to see what she had on our upcoming projects and saw the site has gotten a makeover. It's cleaner looking, and the ads have been toned way down, making it easier to find what you want. The current lead story is about making a "Do It Yourself Chemistry Lab." One interesting question discussed: "Is It Safe to Use Kitchen Glassware for Chemistry?" Helmestine writes:
I remember a chemistry experiment in analytical chemistry class where we were asked to take a piece of glassware from the storeroom, get it as clean as we could, and then the instructor rinsed it with acid and water and showed us the spectrum of the stuff that was still on the glass. As you would imagine, there were heavy metals and some dangerous organics. He was trying to illustrate that even 'clean' glassware isn't inert and can mess up an analysis, but it also went a long way to explaining why we shouldn't make coffee in the lab. Using dishes for chemistry projects isn't the same thing, but it may not be safe.
Her conclusion? Yes and no. "If I make slime or a smoke bomb I'll use dishes, but I'll be careful to rinse them immediately so that no one accidentally eats borax or saltpeter ... but there are exceptions. For example, I wouldn't make green fire in cookware. "

I know a certain 12-year-old that will appreciate my saving those particular links.

Update: Anne Helmenstine left a nice little comment to this post. And I couldn't asking why the little white dish in the green fire photo above looked so much like a Corningware ramekin. Her reply:
Um... (confession time)... that's because it is a Corning ramekin. I think what I said was I wouldn't use ceramic cookware, not that I didn't, lol. When I tried that project, I did not expect the methanol in the Heet to burn quite that hot. I'm surprised the ramekin didn't shatter. For future tests, I used a stainless steel mixing bowl.
Just so you know.

Sabtu, 26 Januari 2008

Penny chemistry - Verdigris and copper plating

Lesson: Copper plus oxygen creates copper oxide (2Cu+O2-->2CuO )
What Happened: Changing the chemistry of pennies and nails changed their color

Anthony (perhaps inspired by a discussion of the construction of the Statue of Liberty in history this week) wanted to see if he could make a penny turn green by soaking it in water. I suggested we also try vinegar. Nothing very dramatic happened, so I looked it up and found this great demonstration on About.com's Chemistry page:
  1. First we mixed 1/4 cup vinegar with 1 teaspoon salt.
  2. Next we dipped one dull penny in for 10 seconds, making it half shiny.
  3. Then we dumped about 20 dull pennies in the solution for 5 minutes.
  4. When the pennies were removed, some were rinsed with water, the rest left to dry as is. Within a couple of hours, the vinegary pennies had developed a nice verdigris finish.
But here's the best part. Once we took out the pennies, we put some steel nails (I couldn't quite tell if they were galvanized -- zinc-coated -- or not) in the vinegar. Over the next few hours, the nails got a beautiful copper coating. Here's Anne Marie Helmenstine's explanation of what happened: The pennies react with the salt/vinegar solution, releasing positively charged copper ions. The vinegar also dissolves the iron and oxides on the surface of the steel nail, giving it a negative charge. The positively charged copper ions are more strongly attracted to the nail than the iron ions, so a copper coating forms on the nail.
During the process, the hydrogen ions from the vinegar (acetic acid) and the metal/oxides produced bubbles of hydrogen gas.

Although it took longer than advertised, the end result was impressive. Most impressive was finding a way to do copper plating without using CuSO4 (one of the caustic copper sulfate experiments from Joy of Chemistry that I had been avoiding doing).


Update: Works on paperclips, too!


Here's a site that gives all the chemical equations involved.

Senin, 21 Januari 2008

Redox Reactions Part Deux

Lesson: Fire produces CO2
What Happened: Hydrocarbon + oxygen = carbon dioxide + water + heat

According to The Joy of Chemistry: The Amazing Science of Familiar Things (pages 79-81), combustion chemistry is another redox reaction. In this one, a hydrocarbon (a compound made solely of hydrogen and carbon) mixes with oxygen. The carbon is (literally) oxidized, losing electrons to the oxygen atoms, and the oxygen gains enough electrons to attract the hydrogen into forming H2O. Here is what we did:
Materials

Safety goggles
Rubber gloves
Votive candle
Wooden match
2 small clear glass jars
Water
Fish tank indicator
Piece of white paper
Balloon
Drinking straw
Ice cube
1. Pour 4 teaspoons (20 ml) of water into a glass.
2. Add 2 drops of fish-tank pH indicator.
3. Put the glass and one of the empty glasses on a white piece of paper. The water should look faintly green-blue.
4. Light the candle. Invert the empty glass over it. Allow the flame to burn out.
5. Turn the glass over and IMMEDIATELY pour the water solution into it.
6. QUICKLY cover the glass with your hand. Swirl the solution around to mix with the gases from the flame.
7. Put the glass back on the paper. It should have changed color.
8. To test that CO2 was the cause of the color change, make another indicator solution as before in clean glass. Blow up a balloon and pinch closed. Put a straw into the opening of the balloon so that the gas goes into the solution. It should change color the same way.

We also did the next demonstration, to prove that fire produces H2O (page 80):

Materials

Votive candle
Wooden match
1 small clear glass jar
Ice cube
1. Light the candle. Hold the glass over it. Place an ice cube on top.
2. Water will condense inside the glass.

Kamis, 17 Januari 2008

Redox Reaction Demonstrations

Lesson: Iron can take the form of two different ions in redox reactions
What Happened: Fe2+ + H2O2 → Fe3+ + H2O + O2
Ferrous iron + hydrogen peroxide → ferric iron + water + oxygen

Today we did some experiments from The Joy of Chemistry: The Amazing Science of Familiar Things (Demonstration 3, Stop-and-Go Chemistry, Page 73) which demonstrated reduction/oxidation, or redox, reactions. In reduction, electrons are gained, creating a negative ion. In oxidation, electrons lost (often involving oxygen), creating positive ions.

In preparation for this experiment, we first made up a batch of iron acetate, as instructed in the front of the book. Wearing Playtex gloves, John pinched off about a cubic inch of fine steel wool. We dropped it into a jar with 2 cups of vinegar and left it to soak for 24 hours. You could see bubbles of what the book says is hydrogen coming off the steel wool ball, which first floated on the top, then sank, then floated up again. (I did not try to ignite the hydrogen, although I thought about it.)


Ingredients for Iron Acetate

Then today, we gathered the following:

Safety goggles
Rubber gloves
Plastic bowls
Teaspoon
Iron acetate solution
Household ammonia
Hydrogen peroxide

First we
ladled 2 tablespoons (30 ml) iron acetate into the bowl. Then we added 1 teaspoon of ammonia to make it turn red. But we found that the color was hardly noticeable. So we added a total of 5 teaspoons. You can see the difference below:


Left: 1 teaspoon ammonia. Right: 5 teaspoons ammonia

Next we dropped in 1 teaspoon (5 ml) of hydrogen peroxide, to turn the solution green. Just the one teaspoon was enough to make the solution the nice dark color.

Since we had set up two bowls (one for each boy) we were able to compare the color change.


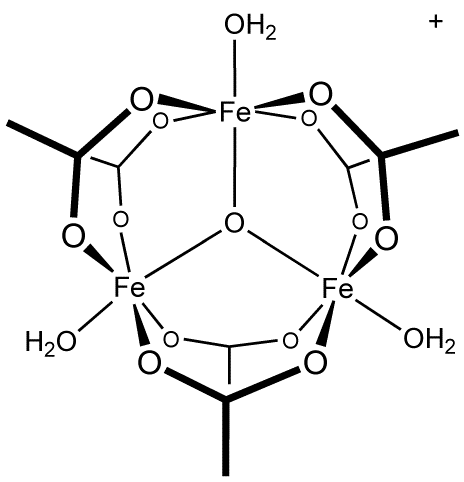
Here is what iron acetate looks like chemically:

Fe3O(OAc)6(H2O)3]OAc (OAc is CH3CO2-)


Anthony helped me with this post. More redox experiments tomorrow!